
3 Tips to Taking Better Photos with your iPhone!
Since we can't have a professional photographer following us around constantly to capture our kids doing the everyday activities that make us smile and laugh, we all turn to the thing we always have with us: our phone. There is a saying that goes, "The best camera is the one you have with you." This is SO true. You will not capture the moment unless you have a camera. We all know the iPhone can take pretty great photos for the everyday purpose, but here are a few tips I have to help you capture your kids and your everyday life even better!
1. Flipping Panoramic Photos. We have all taken panoramic photos of a beautiful landscape, or of a ballgame at Wrigley, or of our ocean view on vacation. But here's something new to try. Have you ever tried to take a photo of something tall and ended up with a photo like the one below? Yes, I got a photo of my kids and right now I remember where we were. BUT, what was really cool was the awesome wood troll they were standing with. That is what needed to be in the photo. With the regular photo setting on my iPhone, I could not get my kiddos AND the entire wood troll in the frame.

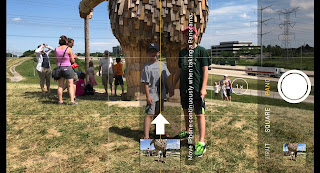 You can easily solve this by opening the camera on your iPhone, switching it to Panoramic and turning your phone horizontally. Take a panoramic photo, moving your phone UP, instead of the normal left-to-right and voila! You have an image that captures something tall, like the two photos below!


Now, panoramic photos with people in them can be tricky. Make sure your subjects stay VERY still (or they will look slightly distorted in the photo like my son above) or keep them for tall skyscrapers, cool tall landmarks, or capturing a great building with a gorgeous sky above it! If your subjects are able to stay still, you might get a gem like the one above! Sky, wooden troll AND my family!
2. Brighten/Darken with the touch of your finger. If you're like me, you've taken your share of way too dark or way too light iPhone photos. Not any more. Give this a try:
 In the regular photo mode of your iPhone's camera (this also works in the iPhone X's Portrait Mode), DOUBLE tap your subject on the screen to focus the camera. From there you will see a yellow box and a yellow SUN appear. Drag your finger up and down to adjust the exposure to how light or dark you would like it. At any point during the process you can single tap anywhere on the screen to reset and start over. Once you have your focus on your subject and your exposure set, snap your photo and you will have a more properly exposed photo like the one below!
 3. Slo-mo where you want slo-mo. Slow motion videos are so fun and if your kids are like mine, they love to make them! However, the timing of slow motion videos can be tough. I'm never sure when to hit record to get the right part of the video in slow motion. Did you know that when filming the slow motion video, you do not have to worry about timing it right? You can make all the timing adjustments in iPhone's Edit afterward!
 So, I opened it up in my iPhone's Edit to make adjustments. See the white lines (the green arrow is pointing to them)? The white lines that are really close together are real time. The white lines that are spread out are slow motion. You can drag and adjust any part of the video by pulling the sliders along those white lines. You can even make the whole video slow motion, or the whole video real time (in case you accidentally took a slow motion video when you didn't mean to....done that!). Once you have adjusted everything, hit done and you have your new video! Below is my video, adjusted so the slow motion doesn't start until shortly before the dog puts her head underwater.
Do you have any favorite iPhone camera tips? Please share in the comments below!
https://www.betsymarkwaldphotography.com/
https://www.instagram.com/betsymarkwaldphoto/
https://www.pinterest.com/betsymarkwaldphoto/boards
1. Flipping Panoramic Photos. We have all taken panoramic photos of a beautiful landscape, or of a ballgame at Wrigley, or of our ocean view on vacation. But here's something new to try. Have you ever tried to take a photo of something tall and ended up with a photo like the one below? Yes, I got a photo of my kids and right now I remember where we were. BUT, what was really cool was the awesome wood troll they were standing with. That is what needed to be in the photo. With the regular photo setting on my iPhone, I could not get my kiddos AND the entire wood troll in the frame.

 You can easily solve this by opening the camera on your iPhone, switching it to Panoramic and turning your phone horizontally. Take a panoramic photo, moving your phone UP, instead of the normal left-to-right and voila! You have an image that captures something tall, like the two photos below!

Now, panoramic photos with people in them can be tricky. Make sure your subjects stay VERY still (or they will look slightly distorted in the photo like my son above) or keep them for tall skyscrapers, cool tall landmarks, or capturing a great building with a gorgeous sky above it! If your subjects are able to stay still, you might get a gem like the one above! Sky, wooden troll AND my family!


Take this video below, for instance. The first video is how it was originally shot. The slo-mo before the fun dog-grabbing-ball-in-the-water action is a way too lengthy for me.

Do you have any favorite iPhone camera tips? Please share in the comments below!
https://www.betsymarkwaldphotography.com/
https://www.instagram.com/betsymarkwaldphoto/
https://www.pinterest.com/betsymarkwaldphoto/boards
Betsy, I love this and this is such helpful information for doing some iphone photography. This is so helpful with family photos coming from a very talented Chicagoland photographer! Keep up the good work!
ReplyDelete